Part 2 - Build Steem blockchain application with Vue.js: components, computed properties and build/deployment process

Repository
Vue.js: https://github.com/vuejs/vue
What Will I Learn?
- Vue.js components
- Computed properties
- How to build and deploy Vue.js application
Requirements
- A Node.js environment (Ubuntu 18 + Node.js is used in this tutorial)
- Basic HTML/CSS/Javascript knowledge
Difficulty
Basic level
Tutorial contents
In last tutorial, you have learned how to setup Vue.js development environment, and build your first Vue.js application to read user profile from Steem blockchain. In this tutorial, you will learn more about Vue.js components, adding computed properties to Vue.js components, and how to build and deploy Vue.js application.
The aim of this tutorial
As demonstrated here, you will add three new components, e.g. Posts, Comments, and Activities and within each of these components, Profile component is included. You will also refactor Profile component to add computed properties and use them in the template. Last but not least, you will learn how to build your project for production and how to deploy your project to a web server.
Add new components
As shown in the wireframe below, three components will be added, e.g. Posts, Comments, and Activities. In addition, Profile will be used in each of these three components.

To do so, you will need to create three files, e.g. Posts.vue, Comments.vue, and Activities.vue in src/components folder. For now, the three components are very similar - the actual code to load information from Steem blockchain will be added later. For example, the content of Posts.vue is:
<template>
  <div>
    <Profile></Profile>
    Posts
  </div>
</template>

<script>
import Profile from './Profile'
export default {
  name: 'Posts',
  components: {
    Profile
  }
}
</script>

<style scoped>
</style>
In the above code, a new component called ‘Posts’ is defined:
export default {
  name: 'Posts',
  ...
}
Since Profile needs to be included in the ‘Posts’ component, it needs to be imported first:
import Profile from './Profile'
Also, it needs to be declared within the ‘Posts’ component:
components: {
  Profile
}
Then the ‘Profile’ tag can be used in the template:
<Profile></Profile>
Similarly, you can define ‘Comments’ and ‘Activities’ component.
Now you may want to use ‘Posts’ component as the default page, and use ‘/comments’ and ‘/activities’ to access ‘Comments’ and ‘Activities’ component. To do so, you need to update the router, e.g. make changes to router/index.js:
import Vue from 'vue'
import Router from 'vue-router'
import Posts from '@/components/Posts'
import Comments from '@/components/Comments'
import Activities from '@/components/Activities'

Vue.use(Router)

export default new Router({
  routes: [
    {
      path: '/',
      name: 'Posts',
      component: Posts
    },
    {
      path: '/comments',
      name: 'Comments',
      component: Comments
    },
    {
      path: '/activities',
      name: 'Activities',
      component: Activities
    }
  ]
})
You may notice that the URL for your application is a bit strange, e.g. the URL for default page is “http://localhost:8081/#/” and the URL for comments is “http://localhost:8081/#/comments/”. The reason for this is because Vue.js has two modes to manage the URL: ‘hash’ mode (default mode) and ‘history’ mode. You can add the following line to router/index.js, just before routes definition:
mode: 'history',
After this change, the url looks normal, e.g. the default page will be accessible via “http://localhost/” and the comments page is accessible via “http://localhost/comments”.
Something is still missing, right? Yes, users can hardly switch between these components/pages. So you need to add a basic navigation bar. Just add the following to App.vue, before “<router-view/>”:
<nav>
  <router-link to="/">Posts</router-link>
  <router-link to="/comments">Comments</router-link>
  <router-link to="/activities">Activities</router-link>
</nav>
Refactor existing code and add computed properties
Now you will learn how to add user’s voting power and reputation to the profile. As those information are not stored in the json_metadata returned by Steem js, so a new data attribute ‘userdata’ is added to store necessary information, e.g.
data () {
  return {
    profile: '',
    userdata: ''
  }
},
And add following to ‘created’ method:
currentComponent.userdata = result[0]
Also, the voting power and reputation returned by Steem js are not in the format you are familiar with, so some additional processes are needed. The computed properties in Vue.js are the perfect way to deal with this. In this case, two computed properties need to be added into Profile.vue:
computed: {
  voting_power () {
    return parseFloat(this.userdata.voting_power) / 100
  },
  reputation () {
    return steem.formatter.reputation(this.userdata.reputation)
  }
}
Now you can use these computed properties in the template:
<div>VP: {{ voting_power }}</div>
<div>Reputation: {{ reputation }}</div>
Build and deployment
To build your Vue.js application, just type this command:
npm run build
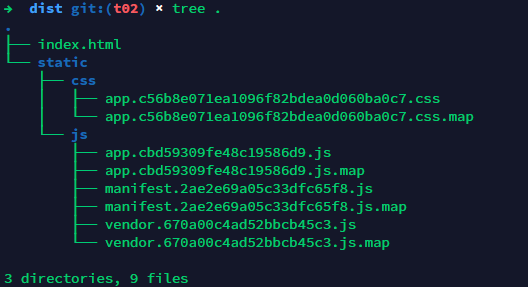
It will build your Vue.js project and generate a static website in ‘dist’ folder. The files in this folder can be seen by running commands:
cd dist
tree .
The output looks like:
The deployment is very straightforward: just copy all files and subfolders within ‘dist’ folder to your web server and then you will be able to access it.
Curriculum
This is the second tutorial. More interesting topics will be covered in the following tutorials!
Previous tutorials
Part 1 - Build Steem blockchain application with Vue.js: installation and first demo
Proof of Work Done
Source code for this tutorial: https://github.com/aa-feng/VuejsTutorial/tree/t02
Master branch of the source code (will be updated with ongoing tutorials): https://github.com/aa-feng/VuejsTutorial
The live demo of latest iteration: https://aa-feng.github.io/


Comments