Part 3 - Build Steem blockchain application with Vue.js: using Bootstrap, nav component, mixins, and first iteration of Posts component

Repository
Vue.js: https://github.com/vuejs/vue
What Will I Learn?
- How to use Bootstrap in Vue.js
- The nav component in Vue.js
- Abstract common functionalities into mixins
- Load posts from Steem blockchain into Posts component
Requirements
- A Node.js environment (Ubuntu 18 + Node.js is used in this tutorial)
- Basic HTML/CSS/Javascript knowledge
Difficulty
Basic level
Tutorial contents
In last tutorial, you have learned Vue.js components, computed properties, and the build and deployment process for Vue.js application. In this tutorial, you will learn how to use Bootstrap in Vue.js, how to use nav component in Vue.js, use mixins to abstract common functionalities, and load post information from Steem blockchain into Posts component.
The aim of this tutorial
As shown below, you will iterate your Vue.js application and add new functionalities: you will add three tabs, load posts from Steem blockchain, and use Bootstrap to control your Posts component layout.
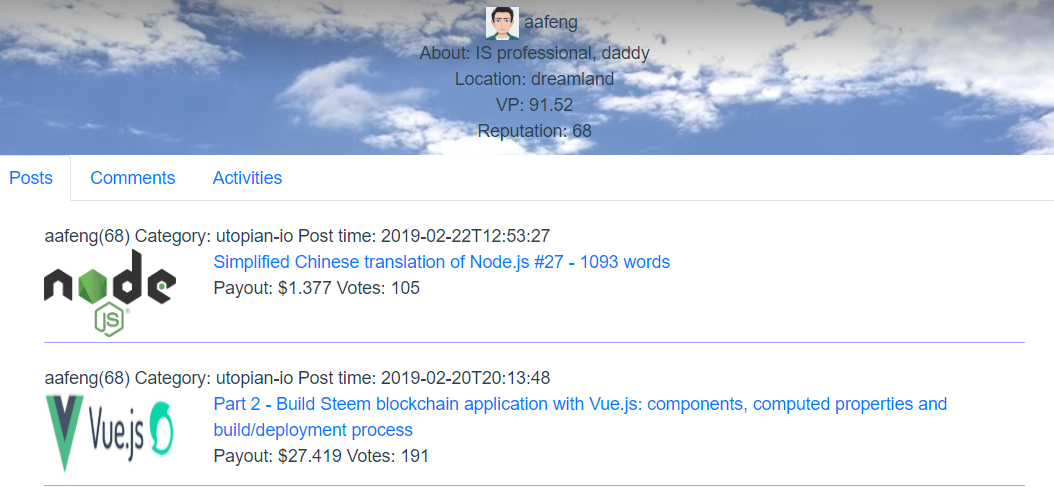
The live demo is here: https://aa-feng.github.io/
Using Bootstrap in Vue.js
Bootstrap 4 is the world's most popular framework for building responsive, mobile-first sites.
First, to make your Vue.js application responsive and control the layout of your components, you will learn how to use Bootstrap in your Vue.js application.
Run this command to install bootstrap-vue and bootstrap packages:
npm i vue bootstrap-vue bootstrap --save
You also need to register BootstrapVue plugin in your application’s entry point, e.g. add the following code to main.js:
import BootstrapVue from 'bootstrap-vue'
Vue.use(BootstrapVue)
Also, import the CSS files:
import 'bootstrap/dist/css/bootstrap.css'
import 'bootstrap-vue/dist/bootstrap-vue.css'
Now, you are ready to use Bootstrap in your components! You can layout your POST component like this:
<div class="row post">
  <div class="row post_header">
    <div class="col-sm-12">
      POST top bar
    </div>
  </div>

  <div class="row post_content">
    <div class="col-sm-2 col-xs-12 post_image">
      THUMBNAIL
    </div>
    <div  class="col-sm-10 col-xs-12 post_image">
      CONTENT
    </div>
  </div>
</div>
It looks like:

The nav component in Vue.js
In previous tutorial, we only have a very basic navigation bar. Actually, Vue.js provides a nice navigation component called ‘nav’. You can change the navigation by changing the code in App.vue to:
<template>
  <div id="app">
    <Profile></Profile>
    <b-nav tabs>
      <b-nav-item active><router-link to="/">Posts</router-link></b-nav-item>
      <b-nav-item><router-link to="/comments">Comments</router-link></b-nav-item>
      <b-nav-item><router-link to="/activities">Activities</router-link></b-nav-item>
    </b-nav>
    <router-view/>
  </div>
</template>
Now you will be able to see the navigation bar as shown below:

You may notice that some code refactoring has been done, e.g. the call to ‘Profile’ component has been moved to ‘App.vue’. The reason for that is because ‘Profile’ component is used by all three components, e.g. Posts, Comments, and Activities. Therefore, it is a better idea to call it in the parent component, e.g. in ‘App.vue’, rather than duplicate the calls in all these three components.
mixins
Mixins are a flexible way to distribute reusable functionalities for Vue components. A mixin object can contain any component options. When a component uses a mixin, all options in the mixin will be “mixed” into the component’s own options.
Since user information, e.g. username, reputation are used in all components, you don't want to duplicate your code across all these components. Mixins is the perfect way to abstract common functionalities into a single place.
First, create file: src/components/mixins/user.js and add the following content:
let steem = require('steem')

export default {
  name: 'User',
  data () {
    return {
      username: 'aafeng', // default username
      profile: '', // Save user's jsonMetadata to profile
      userdata: '' // User's metadata
    }
  },
  created () {
    let names = [this.username]
    let currentComponent = this // Store this of current component (Profile) to currentComponent
    steem.api.getAccounts(names, function (err, result) { // retrieve data from Steem
      if (err) {
        console.log(err.stack)
      }
      currentComponent.userdata = result[0] // save the first user's data to userdata property
      var jsonMetadata = JSON.parse(result[0].json_metadata) // convert user's json_metadata to JSON
      currentComponent.profile = jsonMetadata.profile // save user's json_metadata to user's profile property
    })
  },
  computed: {
    voting_power () {
      return parseFloat(this.userdata.voting_power) / 100 // return a user friendly format of voting power
    },
    reputation () {
      return steem.formatter.reputation(this.userdata.reputation) // return a user friendly format of reputation
    }
  }
}
All above code are moved from ‘Profile.vue’. Then your ‘Profile.vue’ will be much simpler, e.g. the code will be:
<script>
import User from './mixins/user'

export default {
  name: 'Profile',
  mixins: [User]
}
</script>
In the above code, you need to import the User from mixins then you need to declare you want to use ‘User’ mixin in your ‘Profile’ component. The template stays as same as the previous version. In other components, you just need to follow the same rule if you want to use ‘User’ mixin.
First iteration of Posts component
To add posts information to Posts component, first you need to define a data attribute, e.g. posts, as shown below:
data () {
  return {
    posts: [] // user's posts
  }
}
Then, you can use Steem js to retrieve user’s posts from Steem blockchain, as shown below:
created () {
  let postComponent = this
  steem.api.getDiscussionsByAuthorBeforeDate(this.username, null, new Date().toISOString().split('.')[0], 10, function (err, result) {
    if (err) {
      console.log(err.stack)
    }
    postComponent.posts = result
  })
}
You may notice that, for now, only a fixed number of posts are loaded, e.g. 10 latest posts are loaded.
For some information in the posts, e.g. the payouts (pending payouts / payouts), they might be used in other components, so it would be a good idea to define a new mixin, e.g. post mixin to include the common functionalities related to posts. You need to add a new file: src/components/mixins/posts.js with the following content:
export default {
  name: 'Post',

  methods: {
    // return pending payout or paid awards
    payout (post) {
      if (post.pending_payout_value !== '0.000 SBD') { // If it’s pending payout
        return post.pending_payout_value.replace(' SBD', '')
      } else { // if past payout, use total_payout_value
        return post.total_payout_value.replace(' SBD', '')
      }
    },
    firstImage (post) { // return first image URL from page content
      const regex = /(https?:\/\/.*\.(?:png|jpg|gif))/g // For now only check jpg/png/gif images
      let img = regex.exec(post.body)
      if (img === undefined) {
        return ''
      }
      return img[0]
    }
  }
}
In Posts component, both user and post mixins are needed, so declare them as below:
mixins: [User, Post],
Now it is the time to modify the template in Post.vue:
<div class="post_container">
  <div class="row post" v-for="post in posts" :key="post.post_id">
    <div class="row post_header">
      <div class="col-sm-12">
        {{username}}({{reputation}}) Category: {{ post.category }}
        Post time: {{ post.created }}
      </div>
    </div>
    <div class="row post_content">
      <div class="col-sm-2 col-xs-12 post_image">
        <img class="post_thumbnail" v-bind:src="firstImage(post)"/>
      </div>
      <div  class="col-sm-10 col-xs-12 post_image">
        <a v-bind:target="'_blank'" v-bind:href="'https://steemit.com'+post.url">{{ post.title }}</a><br/>

        Payout: ${{ payout(post) }}
        Votes: {{ post.active_votes.length }}
      </div>
    </div>
  </div>
</div>
As you can see, all methods defined in user and post mixins can be used in the template directly. Now, each post shows like below:

Curriculum
This is the third tutorial. More interesting topics will be covered in the following tutorials!
Previous tutorials
Part 1 - Build Steem blockchain application with Vue.js: installation and first demo
Part 2 - Build Steem blockchain application with Vue.js: components, computed properties and build/deployment process
Proof of Work Done
Source code for this tutorial: https://github.com/aa-feng/VuejsTutorial/tree/t03.1
Master branch of the source code (will be updated with ongoing tutorials): https://github.com/aa-feng/VuejsTutorial
The live demo of latest iteration: https://aa-feng.github.io/


Comments